Advanced Spider Solitaire Strategy
This page assumes you’ve read the strategy guide and understand the move decision framework. These techniques are for players who win consistently on 2-suit and want to push their 4-suit win rate above 10%.
Play 4-suit Spider Solitaire → to test these as you read.
The Supermove: Full Formula
A supermove is how you relocate a cross-suit sequence (a group of cards that can’t move together because they’re mixed suits) by using empty columns as temporary staging areas.
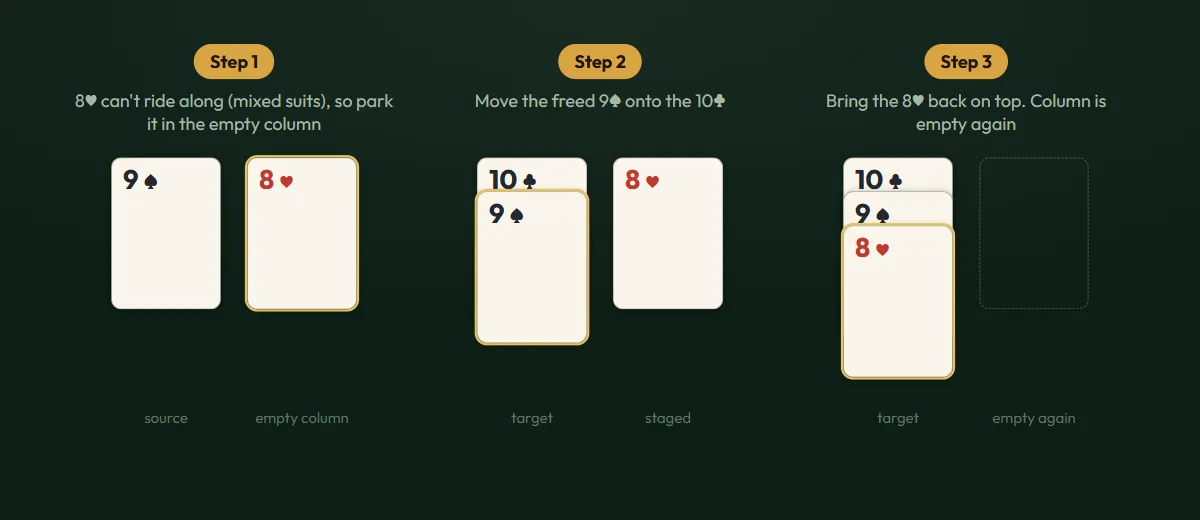
The basic version you’ve probably already discovered: you have 9♠ 8♥ sitting on a column, and you want to move the whole thing to a 10♣. They can’t move as a group (mixed suits), so you:
- Move 8♥ to an empty column
- Move 9♠ onto the 10♣
- Move 8♥ from the empty column onto the 9♠
That’s a 2-card supermove using 1 empty column. Simple.
Where it gets powerful, and where most players stop thinking, is scaling this up.
The formula: With n empty columns and 1 target position, you can supermove a sequence of 2^n cards.
| Empty columns | Max cards you can supermove | |---|---| | 0 | 1 (single card only, no staging) | | 1 | 2 | | 2 | 4 | | 3 | 8 | | 4 | 16 |
Here’s what 2 empty columns looks like in practice. You have a 5-card cross-suit sequence (J♠ 10♥ 9♣ 8♠ 7♥) and you want to move it onto a Q♦. Two empty columns available.
- Move 9♣ 8♠ 7♥ into empty column A (that’s a 3-card group… wait, they’re mixed suit, so you move them one at a time: 7♥ to column A, 8♠ to column B, 9♣ to column A… actually let me work this correctly)
Let’s be precise. You have: J♠ 10♥ 9♣ 8♠ 7♥ on a column, and you want the whole thing on a Q somewhere. Two empty columns (A and B).
- Move 7♥ → column A
- Move 8♠ → column B
- Move 9♣ → column A (onto 10… wait, 9 can’t go on 10 in column A which has 7♥ at top)
Right, this is the subtlety. The staging columns themselves follow the placement rules. You can’t just stack random cards into an empty column; the cards in the staging column still need to be valid placements on each other.
The practical implication: supermove capacity depends on what you’re staging, not just how many empty columns you have. A column that already has a K♠ at the top is actually useful staging for a Q-high sequence. An empty column gives you maximum flexibility. Plan your staging before you start moving.
The real skill is chaining supermoves: use a completed first supermove to free up space for the next one, and cascade your way through a position that looked frozen.
The Empty Column Budget: Spending Wisely
Empty columns aren’t free money. They’re a finite resource, and every time you fill one, you lose capability.
Think of each empty column as having a cost:
1 empty column: you can move 2 cards, or stage 1 card while you rearrange something. Useful but limited. Filling it for a move that advances 1 card in a sequence you weren’t going to finish anyway is almost always a mistake.
2 empty columns: you can execute most mid-game rearrangements. This is the threshold where interesting things become possible. Two empty columns in the mid-game is a comfortable position.
3 empty columns: you can move 8-card sequences. On 4-suit, getting to 3 empty columns simultaneously is a major milestone. It means you can unwind almost any reasonable blockage.
4 empty columns: rare, but when it happens, you can restructure nearly anything. Getting here usually means you’ve been playing very clean and a suit run is imminent.
The mistake players make is treating empty columns as a temporary convenience rather than a strategic asset. You clear a column and immediately think “great, I can move this awkward card out of the way.” Stop. Ask: what’s the highest-value thing I could do with this column? Often the answer is “keep it empty for two more moves until I can use it to finish a suit run.”
There are positions where filling an empty column is correct: when doing so completes a same-suit sequence that scores +100 or creates another empty column. Those compound moves are when you spend budget.
The 3-Move Look-Ahead
The difference between a player winning 40% of 2-suit games and one winning 65% is usually not knowledge of rules or techniques. It’s look-ahead depth.
Most players think one move ahead: “I can put this 8 on that 9.” Good players think two moves ahead: “If I put this 8 on that 9, that reveals a face-down card. What could that card usefully be?” Expert players think three moves ahead: “If I put this 8 on that 9, reveal a card, and that card is anything from a 4 to a King, here are the 4 best follow-up moves I could make.”
You don’t need to calculate every possibility. Three moves of look-ahead in Spider Solitaire is usually enough to distinguish genuinely good moves from moves that just look good.
The mental model: before making a move, ask “and then what?” twice.
Move: 8♠ onto 9♥ (cross-suit, not ideal, but reveals a face-down card) And then what? → A card flips face-up And then what? → If it’s a 7 of anything, I have another move. If it’s a King, I might want to move it to free that column further. If it’s a 3, it’s not immediately useful but now I know what’s there.
This sounds trivially obvious when written out. But in practice, most players don’t do it. They see a valid move and make it. Slowing down to ask “and then what?” twice will improve your win rate more than any specific technique.
Suit Isolation for 4-Suit
On 4-suit, the opening is chaos. 26 cards of each suit spread across 10 columns, most face-down, with the face-up cards in almost random order. The temptation is to just make any legal move and hope order emerges. It won’t.
The technique that separates players who occasionally win 4-suit games from those who win them regularly: pick two suits early and route cards deliberately.
In the first 40 moves, decide which two suits you’re going to complete first. Call them your primary suits. (Spades and hearts are natural choices since they appear in 2-suit, so you’ll be more attuned to them, but it genuinely doesn’t matter which you pick.)
From that point, every time a card of a primary suit appears, ask: “Can this card go somewhere that advances my primary run?” Not “can this card go somewhere”, but specifically somewhere that helps the primary suit.
This means sometimes letting a primary-suit card sit in a suboptimal position rather than moving it to an immediately convenient one. A 7♠ that goes onto an 8♥ is gone from the spade run you’re building. A 7♠ that you leave in place, or move to a column where the 8♠ is, is still on track.
Secondary suits get handled opportunistically. Move them when moving them doesn’t cost primary suit progress. Don’t sacrifice a spade run to tidy up a diamond sequence.
The reason this works: 4-suit games are almost always won through completing runs in pairs. Get two suits done and you have two empty columns. Use those to accelerate suits three and four. The compounding effect only kicks in once the first two runs clear, and that only happens if you were deliberate about it from move 1.
Stock Timing: The Specific Triggers
The strategy guide says “deal late.” This page gives you the actual triggers.
Deal when all of these are true simultaneously:
- Every face-down card is revealed (or it’s move 30+ and revealing new face-down cards requires more than 2 supermoves per card)
- No same-suit move exists anywhere on the board
- No cross-suit move reveals a face-down card
- No cross-suit move creates or extends a sequence that’s within 5 cards of completion
If one of those conditions isn’t met, there’s still a move to find. Scan again.
Never deal if:
- Any column is empty (you’re blocked anyway, but the instinct to deal when stuck is strong; resist it)
- You have an in-progress same-suit run that’s 8+ cards long and dealing would likely bury it (count the columns: which ones are likely to receive cards that conflict?)
The pre-deal check: Before clicking stock, identify your best in-progress run. Look at the 3–4 columns that would most likely bury it with a new card. Is the risk acceptable? Sometimes it is: the information and new options a deal provides are worth the risk. Sometimes you can see that the deal will land on the worst possible columns and make a bad position worse. When that’s obvious, undo your way back to a position where there’s still a legitimate move left.
When to Sacrifice a Sequence
You’ve spent 15 moves building a 9-card same-suit spade run. Then you realise the only way to free a buried card that you desperately need is to break that run up.
Do it. Most players won’t, because the sunk-cost feel of dismantling a long sequence is genuinely uncomfortable. But a 9-card spade run sitting trapped in a column while the rest of the game dies around it isn’t progress. It’s a liability.
The right question isn’t “should I break this sequence I spent effort building?” It’s “is the sequence serving me right now?” If the answer is no, if the only legal moves it participates in are the moves that break it, then breaking it is the correct call.
The practical version: if you have a 7+ card same-suit sequence and you need the card buried under it, use your empty column budget to unwind the sequence temporarily, access the buried card, and then rebuild. Yes, this takes moves. It also often saves the game.
One good heuristic: if breaking a sequence and rebuilding it would cost fewer moves than dealing from the stock twice, break it.
Dead Position Pattern Recognition
A dead position is one where no sequence of moves wins the game. The earlier you recognise it, the less time you waste.
Four board states that reliably signal a dead or near-dead position:
1. Isolated suit cards with no path home. If you need a 6♦ to complete a diamond run and the only 6♦ on the board is buried under 8 cards of mixed suits with no empty columns to unwind them, and the stock is exhausted, that game is over.
2. All empty columns filled with orphan cards. An “orphan card” is one that has no legal destination on the current board and nothing useful can go on it either. A single orphan in an empty column is a problem. Three orphans occupying three empty columns when you need those columns for supermoves is almost always fatal.
3. Stock exhausted + no same-suit moves + no empty columns. When all three of these are true simultaneously, the game is 90%+ likely dead. There are rare exceptions (sometimes a cross-suit move reveals a card that cascades into a solution), but they’re rare enough that spending 20 minutes looking for one isn’t usually worth it.
4. Two or more suit runs with their Ace buried deep. Each suit run needs its Ace last. If two suits each have their Ace under 6+ mixed-suit cards with no accessible path, you’d need to unwind both of those piles in sequence. If the board doesn’t have the empty column budget to do that, it’s dead.
The value of recognising these patterns isn’t just saving time. It’s also calibration: noticing when you created a dead position by a choice 20 moves earlier, and training yourself not to make that class of choice again.
Quick Reference
| Technique | When to use it | |---|---| | Supermove (1 empty col) | Moving a 2-card cross-suit sequence to a better position | | Supermove (2 empty cols) | Restructuring a 3–4 card blockage | | Supermove (3 empty cols) | Unwinding a 5–8 card sequence to access buried cards | | Suit isolation | From move 1 on 4-suit: pick 2 primary suits and route deliberately | | 3-move look-ahead | Before every non-obvious move: ask “and then what?” twice | | Sacrifice a sequence | When the sequence isn’t advancing and breaking it costs fewer moves than two deals | | Recognise dead position | Stock exhausted + no empty columns + no same-suit moves |
Where to Go Next
- Strategy Guide: the foundation this page builds on, including the move decision framework
- 4-Suit Spider Solitaire: put these techniques against the hardest difficulty
- Play Spider Solitaire →: 1-suit to warm up, then step through the difficulties